Game Automation with Unity Tutorial #2

Prerequisites

Once you install Unity from the Unity Store, it will also install the following:-

  • Visual Studio Community Edition:-  Visual Studio is our recommended IDE to write code as it is much more advanced than MonoDevelop. It can also be downloaded from here if not installed along with Unity.
  • Visual Studio Tools for Unity – This is required for debugging. You can download it from here if not installed along with Unity.

Writing your First Automation test

The Unity Test Framework is derived from NUnit. So you can expect all NUnit features to be there in addition to some features that Unity brings along. A sample Test is illustrated here:-

ss Capture

Lets understand the above :-

[UnityTest]:- This is an attribute(read “annotation” if you are more familiar with Java) which tells the compiler that the code which follows is a Unity test case.

public IEnumerator AddSphereTest ():– IEnumerator is the return type for coroutine. A coroutine is a function that can suspend its execution until the given Yield instruction finishes. Every Unity Test should return a coroutine. For more info on coroutine, you can refer this link.

yield return StartCoroutine(AddSphere()):- This is a yield instruction which will start  another coroutine named AddSphere () and then wait for its completion.

GameObject go=GameObject.Find(“Sphere”):- The Find method of the GameObject class can be used to get a Game object from the unity scene. It can also be used to create or destroy objects.

Assert.IsNotNull(go , “Sphere is not found”):-  This is a simple NUnit Assertion. If there is any object with name “Sphere” in the unity scene, then it will pass otherwise it will fail.

GameObject Sphere = GameObject.CreatePrimitive(PrimitiveType.Sphere):- This is  to add a primitive  sphere in the Unity scene.

Your Tests will be formed by a combination of yield instructions and assertions. For knowing more about them, you can refer the following links:-

Yield instructions in Unity

Assertions in NUnit

Happy Automating !

Nitin Mittal

Game Automation with Unity Tutorial #1

What is Unity ?

Unity is a cross-platform game engine developed by Unity Technologies, which is primarily used to develop both 3D and 2D video games for computers, consoles, and mobile devices.

Unity uses C# as the programming language. 2 IDE’s are commonly supported for Unity Development:-

  1. MonoDevelop:- Its the default IDE provided by Unity. For developers, it simplifies the process to port .NET applications created with Windows to Mac(or vice-versa), maintaining a single code base for all platforms. This IDE is integrated with Unity by default.
  2. Microsoft Visual Studio:- In most cases, this is the de-facto IDE for C#. Visual Studio 2017 Community Edition comes along with Unity itself.

Creating games is pretty easy with Unity. In case you don’t believe me, have a look at a small tutorial on how to create a Fruit Ninja game in Unity.

Testing Games created with Unity

Game Testing’s wiki page gives you an insight into how complex can testing a game can be. Broadly speaking, we can categorize Game testing into 2 categories:-

  1. Black Box Testing – The tester behaves like an end-user and does not worry about the internal working of the application.
  2. White Box Testing – The tester knows the application/code inside out and then performs the Quality check of each component.

Black box testing of games is a necessity but sometimes we neglect White Box testing. As Games grow bigger, they require frequent updates. We need to make sure that an update is not affecting the existing functionality. In the testing world, this is termed as regression testing.  This is where Game automation comes to the rescue as it can drastically reduce the time taken to ensure everything is working as expected or not. With short release cycles, it kind of becomes a necessity.

For Part 2, click here.

Happy Automating!

Nitin Mittal

Hasta la vista Monday Blues!

2297c6

*In case you are not sure what “Hasta la vista” means, let me google that for you.

As per my observation, a lot of professional people around me have been suffering from this syndrome. I noticed off-late that these species are growing in number. This made me don my thinking hat and get into the roots of this problem. This was intriguing since I had not experienced this “Monday Blues” feeling ever in my career.

After doing my bit of research, I concluded that following are the ingredients of the secret sauce that help me repel this “blu-ish” feeling:-

1. Don’t work by the clock-

Since our school days, our brain has been conditioned to work according to the clock. This can continue from school/college to our professional lives. We need to tell our brains to grow up! This won’t ever help you career-wise.

Focus on the task/problem at hand. It may be the case that you’re working only 3-4 hours in a day or maybe 15-16 hours. It all depends on what needs to be done. Extreme cases of both situations (spending less or more time in Office) can be harmful.

2. Make work interesting!

Computer operator welding machine.

A meager percentage of people are blessed with having interesting work to do on a daily basis. For all the other people like me, we need to figure out how to make work interesting. In case the work we are doing is of monotonous nature, we may need to figure out a way to automate it. The machines are rising for real! So why not put them to work and focus on the good stuff rather than the boring tasks.

On a casual lunch conversation, one of my colleague mentioned that he did not feel like coming to Office today. I asked the person that hypothetically if you were working on Project X (which is quite interesting), would you come to Office 2 hours early?

The answer was a resounding YES. That clearly justifies that having interesting work to do can make you work more, learn more and grow more!

3. Know your fuel

suppressing-the-truth-with-duct-tape[1]

There is a driving force that pushes us to the limits when we are down. It’s is crucial to know yours, because this is what will keep the fire burning. For me, it’s Music. It actually helps me in whatever situation I am in. Here are some of the examples:-

a) I was here by Lady Antebellum – This song talks about leaving a mark wherever you go. So this motivates you to do things that will leave a lasting impression on places you have been to.

b) Harder, Better, Faster, Stronger by Daft Punk – This is a cult one by Daft Punk. A great way to start your day!

c) Not Afraid by Eminem – Eminem talks about taking chances in this one. It inspires me to do stuff that some other people think is not possible. This one tells you that you should never underestimate yourself.

d) Not Giving In by Rudimental – When an issue is taking long hours to debug, a small break with one of these songs sometimes does wonders to my confidence level.

Let’s start a revolution against Monday Blues!

#HastalavistaMondayBlues

REST API Automation Training

API Tutorial - Harshit

REST APIs form the core of a lot of modern businesses. Want to become an expert at REST API Automation with Java ? Learn2Automate’s comprehensive training plan is tailor-made for Testing Professionals to become Automation Experts! Some of the highlights:-

  1. Extensive knowledge about REST API Architecture and Terminologies.
  2. Hands on Exercises with Google APIs.
  3. Sharing of Ready to use Framework – Java + TestNG + Maven + REST Assured.
  4. Continuous Testing of APIs with Jenkins.
  5. Insight into Automated Automation of REST APIs.

Drop a mail to info.learn2automate@gmail.com to know more.

Happy Automating!

Harshit Kohli

Time to “eclipse” pre-historic tools! (IntelliJ vs Eclipse)

quartz_eclipse

I meet a lot of Automation testing professionals who work with Java. From my experience, more than 80% are using Eclipse as the IDE of choice. When I ask them why is Eclipse their choice, they are like:-

giphy

To all these people out there having no “Idea” why they are on Eclipse, I would say go get IntelliJ Idea! The list of features that are better than Eclipse is huge. Here are some of the points that stand out:-

  1. Code Completion – Coming from Eclipse to IntelliJ, the intelli-sense(or code completion) would feel like you have been upgraded to a business class ticket from economy class on a flight. In my experience, it better understands what we intend to write in comparison to Eclipse.
  2. Debugging – Debugging is a breeze. For e.g: If you put a break-point on a line, without even going to watch, it shows the values of the variables along side the code itself.
  3. Decompilation of External JARS – While debugging, we can decompile JAR files on the fly which basically means you can go inside any library’s code by just doing Ctrl+Click. We even apply breakpoints in third-party code without having the source code attached.
  4. Git Integration – The out of the box support for Git integration is extremely easy to use and acts as a better alternative to using the Git Bash/GUI.
  5. Built-in Static Code Analysis – Why use external tools, if the IDE itself is doing the Static code analysis!

At the end of the day, its all about Productivity and i’m pretty confident, IntelliJ IDEA will help you raise yours(in case you are still using Eclipse)!

Happy Automating!

Harshit Kohli

Some (non-alcoholic) “VodQA” at ThoughtWorks Gurugram!

a85087301489875ce8a064f973bc308f

A Saturday with a bunch of Geeks and a handful of Passionate speakers. That is VodQA for you! I got the opportunity to attend this meetup at ThoughtWork’s Gurugram office located in the swanky Cyber City area.

I must say that the start was a bit lousy as we had to bear with some ThoughtWorks videos many times and I almost had it memorized the third time it played. I think the videos conveyed what they wanted to when they were played the first time 🙂 Nevertheless that was the only low point for me during the whole day.

The first session of the day was QAOps: QA Testing in a DevOps World by Mr. Adidas and Himesh(these were nicknames chosen by the audience). The talk was about the role of QA’s in Operations and the ideology was using Infrastructure as Code to spin up environments with ease and adding the QA flavor to this by making sure we test the infrastructure as well as test the application under test on the infrastructure created. I really liked the extensive research done by the ThoughtWorks guys and how they finally zeroed in on Ansible after consideration of various factors.

The second session was Docker – A Tester’s Friend or Foe by Mr. Pa & Desi Ghee. This was a introductory session on Docker and frankly I did not find any point which justifies Docker being a “Foe” for testers. I’m myself quite a religious follower of Docker and a firm advocate of its value add to the test setup. The way Mr. Pa explained the concept of containerization was pretty helpful for beginners to understand the concept. There were some insightful discussions regarding how Docker works internally which were quite informative.The third session was Ansible – Continuous Deployment is a breeze by Mr. Sufi & Bevda. Mr Sufi really impressed with his passion and knowledge about the topic. This covered almost every thing that anyone would need to understand how we can setup Ansible for a project. The highlight for me was the Ansible Tests feature which allows you to put assertions to test the infrastructure in a yml file.

I completely echo the sentiment portrayed from the feedback shared by the other attendees:-

IMG_20171007_131820

A day well spent indeed!

PS: Here are the original names of the presenters:-

AdidasVivek Mahajan (he was wearing an Adidas Originals Tshirt)

HimeshArpit Singh (he is a bathroom singer)

PaRavinder Singh(he just loves spending time with his child)

Desi GheeHarmeet Singh(he is a foodie)

SufiManjyot Singh(a Sardar who doesn’t drink!)

BevdaGopal Sharma(you’ll find him in a bar after Office)

Happy (Continuous) Automating!

Harshit Kohli


Here is why you ought to be on LeanFT 14.01!

HP(Now Micro Focus) has stepped up their game with the updates to LeanFT all through 2017. The version change itself speaks volumes about the magnitude of the change from version 12.54 to 14.0. Maybe they were skeptical about the so-called “unlucky” number 13 🙂

Some of the worthy improvements in the 14.x upgrades are:-

  1. Cross Platform Support(14.0) – LeanFT now works on Linux and Mac also. This link has information about the specific features supported.
  2. Parallel Tests(14.0) – I have been waiting for this to be officially rolled out since the first launch of LeanFT. Though this was possible in earlier versions with some hacks, its good to see that LeanFT finally has this powerful and much needed feature. Get to know more at the documentation link.
  3. LeanFT for Selenium(14.0) – LeanFT expanded its umbrella by giving us this feature and saying that – “Go write your Selenium Tests the LeanFT way!”. By “LeanFT way,” I mean using the Object Identification Center(there is a dedicated one for selenium) to generate code. This actually makes test automation code generation much faster. Get started here.
  4. Test Recording(14.1) – Not a big fan of recording but people at HP have made a fortune out of selling the “Recording” feature in UFT so there must be a lot of audience for it. For all the recording fans out there, go play with LeanFT as you did with UFT! Read this article for getting started.
  5. Docker Support(14.1) – We can now use the LeanFT docker containers to setup our Test execution. This enables us to run our tests with close to zero effort in installation and is a boon for the CI/CD worshippers. Have a look at this link for more.
  6. StormRunner Integration(14.1) – LeanFT scripts can be used to run Performance tests through StormRunner. More information here.

I think the above points justify the fact that its called “UFT Pro”. You can go to the Micro Focus LeanFT website for more knowledge on LeanFT.

Happy Automating!

Harshit Kohli

Emailable Extent Reports with Jenkins

Many people including me swear by the sheer awesomeness of Extent reports! The fact that it’s community edition is able to provide a more than presentable HTML Test execution report is great and it helps in quickly setting up a reporting mechanism for your Tests.

We all love Jenkins pipelines, don’t we ? So I was setting up a Jenkins job that needs to send an email-report once it finishes….

THE PROBLEM:-

When we use the Extent HTML report as part of the Jenkins job’s report Email’s content (with the help of the Email extension plugin), the report turns up without any CSS. The reason is that Outlook doesn’t support CSS in the Email content.

THE SOLUTION:-

  1. Use TestNG’s emailable report – This is the easiest way out as this report has plain HTML content rather than any fancy CSS.
  2. Attach the Extent report as an attachment rather than the Email’s content – This works but I don’t want my recipients to click to the open the report and then view it. After all, time is money!
  3. Hack into Extent’s HTML report and create a new email-able one that puts important info into the email body.

I implemented option 3 after not being satisfied from the previous 2. So, following are the steps that need to be done in order to send the extent report as part of your report email’s content:-

Prerequisites :-

  1. You should have a Jenkins job that generates an Extent report in the workspace of your job.
  2. Take a clone of the code present at – https://github.com/kohli-harshit/extend-extent-report
  3. Provided you have maven installed, if you navigate to the directory where pom.xml resides and execute the Maven command – “mvn package”, this should create a JAR file with dependencies in the target folder.
  4. Download PhantomJS executable from http://phantomjs.org/download.html

After prerequisites are complete, you need to do the following :-

  1. Add a build step in your job which calls the generated JAR file with the parameters – Extent HTML Report path(testreport.html), Destination Path where New report should be saved(I prefer workspace) and the folder path where PhantomJS executable is present. The build step should look something like:-

The output of the above command should be that a file named emailreport.html should be created in the workspace of your Jenkins job. The difference between this file and the default testreport.html is that instead of having data inside the html, it has snapshots(to preserve the look and feel as we can’t do it with CSS).

2.Install the Email-ext plugin on your Jenkins server.

3. Add a PostBuild step by selecting Editable Email Notification and configure the email body like:-

The trick here is that the Java code that we ran opens the default extent report with PhantomJS headless browser, takes snapshots of the key sections and put the png files in the workspace of the Jenkins job. The Email notification plugin attaches the PNG files created with the email and they are displayed inside the content of the Email as we gave the newly created HTML in the email body.

Here’s a comparison with TestNG emailable reports:-

Sample Report available here.

Happy Automating!

Harshit Kohli

Squish Tutorial Part 3 – Getting to know the IDE

Picture3

The screenshot above shows how your screen looks like when you launch the Squish IDE. The number labels on each section of the snapshot correspond to the following:-

  1. The button just below label 1 enables us to create a Test Suite which is nothing but a collection of Test cases.
  2. The button just below label 2 helps us define the settings of the Test Suite. The most important setting that needs to be understood as of now is the AUT(Application under Test). We need to define the path to the application that we need to test.
  3. The button on the left of label 3 opens the object map which is nothing but a collection of object descriptions that are used to identify the objects in the AUT at run-time.
  4. Test cases are added in the section designated by label 4. There are two types of test cases that can be added – Script Test Case or BDD Test Case.
  5. Area designated by label 5 stores resources specific to a Test case. The types of resources are – Scripts, Test Data, Verification Points and Gestures.
  6. Area designated by label 6 stores resources just like Test case resources but the difference is that these are shared amongst the whole suite.
  7. The button just below label 7 is used to launch the AUT that we defined in the Test Suite settings. A Red colored button just next to this button is used for starting the recording.
  8. Area designated by label 8 is where the recorded script will show up.
  9. Area designated by label 9 shows the results of the test execution as well as some logs that may assist you while doing analysis of issues.
  10. Label 10 shows the section where we can place some Global scripts that can be used throughout all Test suites created in Squish.

I hope you are now familiar with the look and feel of the Squish IDE.

Happy Automating!

Harshit Kohli

Squish Tutorial Part 2 – Setting up and understanding Architecture

Assuming you have a valid Squish license, and there is an application you want to automate, lets start our Squish journey.

The first thing that needs to be done is to install Squish on your machine. A prerequisite for installing Squish is that you should have Java JDK on your machine. After you are done installing JDK from Oracle’s web site, you need to download the specific squish package needed for testing your application.

Every Squish package name is of the form squish-<squishVersion>-toolkit<toolkitVersion>-<platform>-<compiler>. Example squish-6.1.0-qt47x-linux64.exe. More info available at the official documentation page.

After installing Java as well as the desired Squish package, you are ready to Rock!

The bin folder in the Squish directory contains the squishide executable which launches the IDE. Before exploring the features of the IDE, lets understand the architecture of Squish.

There are primarily 3 components of Squish:-

  1. Squish IDE – Gives a graphical interface for ease of development as well as execution
  2. Runner – Used to Execute or Record Test cases
  3. Server – Handles the communications between the runner and the application

When operations are performed from the IDE, they are in the backend calling the Runner and Server only and this implies that both the runner and server can be executed without the IDE also(i.e. from the command line). For learning purposes, its best to use the IDE for now.

Lets make it more clear with the following diagram from the documentation:-

The division in the diagram shows that the green and the blue regions can be on different machines also. For the sake of simplicity, lets assume they are on a single machine for now. The flow of the automation goes something like this:-

  1. The Squish IDE helps us create the Test Script
  2. The Squish Runner reads commands from the script and sends them to the server which is listening for the commands.
  3. The Squish Server interacts with the Application under Test through the hook it injects during launching the application
  4. After the server executes a command on the Application, it communicates the result to the runner which in effect reflects in our IDE.

Questions ? Feel free to comment.

Get to know the IDE in Part 3 of the tutorial

Happy Automating!

Harshit Kohli

Squish Tutorial Part 1 – What the Frog ?

Lets get to know Squish !


Froglogic’s Squish is a GUI Automation tool which is proficient in automating – Qt, Java, Web, Windows, iOS, Android and many other types of applications. The USP of the tool is the simplicity with which we can create end to end running tests. Some of the features of the tool are:-

  1. Cross Platform compatibility – Create on Windows, run on Mac and vice-versa!
  2. Choose your Language – Coding can be done in JavaScript, Python, Perl, Ruby or Tcl
  3. Record and Replay – Just record the scenarios and the job is half done!
  4. Powerful IDE – Squish offers an Eclipse-like IDE which makes the automation process easier and streamlined
  5. Wide Integration support – Squish can be integrated with JIRA, ALM, TestLink, Jenkins, Maven and many other tools

Squish is a paid tool(with a hefty license cost!) but if you have applications other than plain Web-sites and you want to use a tool which is a one-stop shop for all applications, it is a good choice(provided your company’s bank balance allows it :)).

If you want to know more about Squish, you can go to my next post which explains how to setup Squish and the architecture upon which it is based.

Happy Automating!

Harshit Kohli

Squish Training Programme

Squish is a one-stop shop for automating Qt, Java, Windows, .NET, Web, iOS, Android and many more types of applications. Some of the standout features include:-

  1. Cross Platform
  2. Multiple Language Support – Python, JavaScript, Perl, Ruby and Tcl
  3. Ability to Record + Replay tests
  4. Data Driven, Keyword Driven as well as Behavior Driven testing support
  5. Visual Verification of application components
  6. Distributed Batch testing
  7. Support for Continuous Testing via Jenkins

Learn2Automate’s Squish training program equips you to utilize all above features Squish has to offer by using Python as the language. Online + Classroom training available. For more details, drop an email to info.learn2automate@gmail.com.

How to create Functional Mobile Test in LeanFT (UFT Pro) in Intellij (Java) Part I

This post is a part of our Mobile Testing series using HP Mobile Center. Please go to our previous articles in this series to learn about HP Mobile Center.

In this post, I will discuss how to create Functional Mobile Test in LeanFT (UFT Pro) in Intellij. You can go to post detailing the process of connecting LeanFT (UFT Pro) to Mobile Center.

First of all, we have to connect to Mobile Center server to open application in device connected to Mobile Center to create Test Objects

Open Application Under Test (AUT) in Mobile Center 

  • To do that, click on LeanFT > HPE Mobile Center Icon in Intellij Toolbar

MC_Icon_Intellij

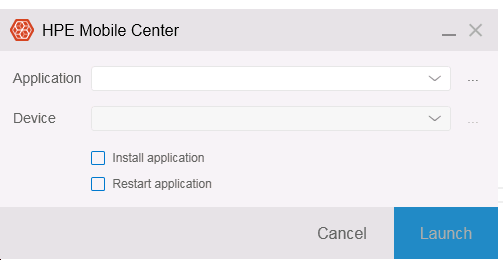
  • If LeanFT is connected successfully to Mobile Center (as detailed in previous post), then the following box will appear:

MC_LFT.png

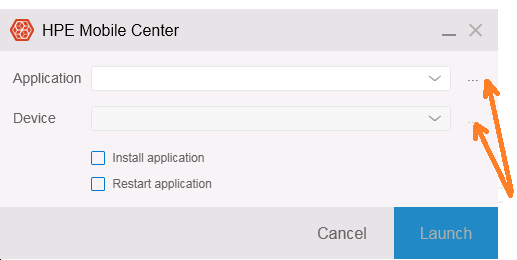
  • Then click on dotted button against Application and Device fields to choose Application and Device respectively
  • Select either Install Application OR Restart Application checkbox if selected application is not installed on the selected device and needs to be installed OR restarted

MC_LFT

  • Click on Launch button after selecting Device and Application. A window with selected device and application (AUT) opens for user to start capturing properties of the objects in the device

MC_App

Create Test Steps:

Now, we are ready to add/create objects of the Mobile Application in our LeanFT Test. We can do it in 2 ways:

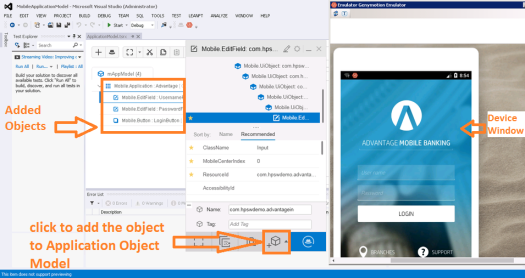
  • Either adding test objects to Application Model
  • Capture Test Object properties using Object Identification Center (spy)

We will be covering creating Test Steps by adding Test Objects to Application Model in this post.

  • Create new LeanFT Application Model Project
  • Create it as a Maven project
  • Add LeanFT dependencies as described here
  • Add Test Objects to it

MC_LFT_AM.png

  • Once all the test objects are added, then save the project and execute mvn install command
  • A jar file will be created in the local maven repository path
  • Note down the group, artifact and version of this project from pom.XML file. It should look something like below:
mobile
mAppModel
1.0-SNAPSHOT
  • Close the existing project after saving it and create new LeanFT JUnit Project
  • Create it as Maven project
  • Add LeanFT dependencies as described here
  • In pom.xml , add the following dependency

      mobile
      mAppModel
      1.0-SNAPSHOT

  • Then, in test method under @test annotation, code can be written using test objects added in the Application Object Model using the below hierarchy depending on the application type:

                       Native Application:
                       Device > Application > Test object

                       Mobile Web Application:
                       Device > Application > WebView > Page > Test object

  • First, the device should be locked using any of the methods (such as lockDeviceByName,lockDeviceById etc) of MobileLab class so that no other can use the device while test is getting executed
  • Device should be unlocked using unlock method of created device object so that it is free to use

//locking device
Device device = MobileLab.lockDeviceByName("Vijay's Emulator");

//instantiating Application Model Class
ApplicationModel aModel = new ApplicationModel(device);

//Installing and Launching Application
aModel.AdvantageApplication().install();
aModel.AdvantageApplication().launch();

//Enter Username and Passsword
appModel.AdvantageApplication.UsernameFieldEditField.setFocus();
appModel.AdvantageApplication.UsernameFieldEditField.tap();
appModel.AdvantageApplication.UsernameFieldEditField.setText("testuser");
appModel.AdvantageApplication.PasswordFieldEditField.tap();
appModel.AdvantageApplication.PasswordFieldEditField.setText("Password"); 

//Tap on Login button
appModel.AdvantageApplication.LoginButton.tap(); 

//Unlocking device
device.Unlock();

Stay tuned for my next post detailing the process to code Test Objects manually